After Reading This Post, You Will Learn How To Turn Off Windows Update In Windows 10, And Automatically Reduce the Background Data Windows 10 Consumes
In all Windows 10 PCs, automatic updates are enabled by default; this means that your PC will always have the latest features.
With Windows 10 auto-update, you have no reason to search for the latest updates or even worry about critical fixes or device drivers for Windows.
The Windows Update automatically installs all updates once they are available.
Keeping aside the advantages of Windows updates, some users will not like to enable auto Windows updates, mainly because Windows Update is data-consuming. And as well it might take up system resources while on critical work.
In Windows 8.1 and earlier Windows Operating systems, Microsoft allowed users to turn off auto-updates completely from the “Action Center.”
Unfortunately, Microsoft did not give any option for users to turn off Windows updates in Windows 10.
Are you wondering why Microsoft didn’t provide an option to Turn Off Windows Update in Windows 10?
Relax there is still a workaround way to Turn Off Windows Update in Windows 10 easily.
How to Turn Off Windows 10 Update
Follow the steps below to Turn Off Windows Update In Windows 10
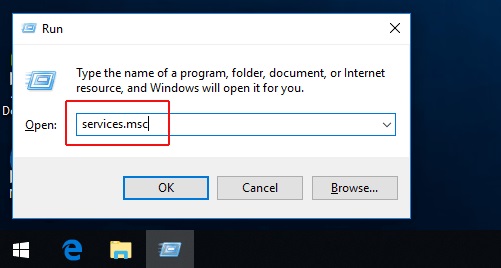
1) Press Windows Key + R to open Windows Run Box, type in services.msc, and click OK.
Alternatively, you can search for services.msc in the Search box and open it.
2) Look for Windows Update in the list of services.
3) If seen, Double click Windows Update services, a Windows Update Properties window will open, and select “Disabled” in the Startup type list box.
4) Then click Apply and Ok and Restart your PC.
Once done, Windows 10 Update will process itself not start on your PC again. This means you will never get new updates automatically from Microsoft.
I recommend using this workaround only when you have to disable Windows 10 automatic updates.
If you want to revert the changes, you will have to follow the same steps again. Instead of “Disabled,” you will have to select “Automatic” in the Windows Update Properties window and then apply it.
How about if your computer is connected to a network that updates and is managed by group policy?
In this case, you might not be able to make changes to settings related to Windows Update, not to mention turning off Windows Update in Windows. For this, you will have to contact the organization’s support personnel.
But if you are among the Administrators, you can follow the steps below to make the necessary configurations relating to Windows Update.
- Open Group Policy Editor by typing “Edit group policy” in the Search box.
- Then go to Computer Configuration >> Administrative Templates >> Windows Components >> Windows Update.
- After which, click the Settings where you need to change and do the configuration it according to your needs.
RELATED ARTICLES


