This post will educate you on how to add and remove password protection on MS Word Documents
One of the world’s most used word editors is the Microsoft Word (MS Word) Editor. This is because of its simplicity and flexibility when compared to most other editors.
MS Word has been there for a very long time, it is actually the pioneer of word editors.
Statistics have shown that over 20 million word documents are created on a daily basis, for educational, business, and other purposes.
If you are reading this article, that means that you have contributed to the number of Word documents created, and you need a way to protect the document you have created.
Sometimes it’s just very necessary to protect your documents, especially if the documents are meant to be highly confidential.
I am sure you would not want unauthorized people to gain access to your privacy.
How about if a few of your friends have used your computer, would you then deny it from them just because you have some vital information that you don’t want them to see?
Why not just add a password to your Word documents, and prevent people from viewing them, and save yourself from the whole stress.
By so doing, anyone who can gain access to the documents is those you gave the password to.
Best features of Microsoft Word
- Colors: It comes with different types of colors to make edited documents very attractive.
- Images: MS Word allows the insertion of multiple images within your document.
- Videos: Amazingly, unlike most other editors, with MS Word you can insert videos into your document
- Fonts Styles: It has a wide range of font family and font stylings.
- Page number and size: Page numbering can be done automatically without any stress.
- Tables: Tables in MS Word are used to represent data in Tabular form
- WordArt: It provides various writing designs for your documents.
- Chats and Graphs: These can be used to represent statistical data in a document.
- Animations: MS Word allows users to create Animations to their needs
- Page colour and border: MS Word allows adding colours to each page as well as borders.
3 Reasons to add a password to a Word Document
- When you want to limit access to the document
- If your computer has multiple users
- If you sell documents, where people will have to pay for the password
How to set a password on MS Word documents
The steps here explain how to protect your MS Word documents.
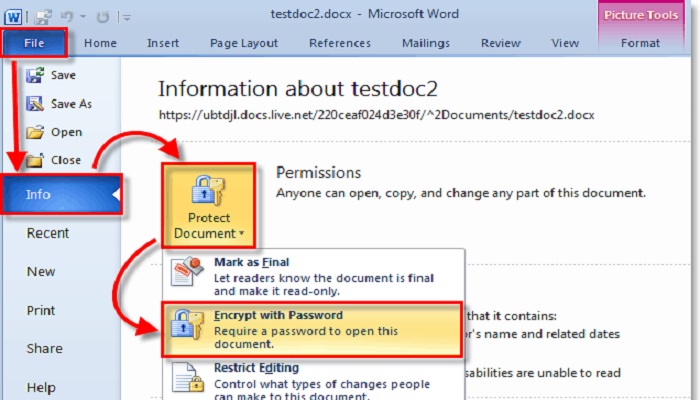
1. Open the Microsoft Word document: I believe you already have Microsoft Office installed on your computer. Microsoft Word is one of the packages that come with the Microsoft Office suite. Look for the Word App and launch it.
2. Click on the “File” menu shown on the top left of your document.
3. After this, click on “Info” in the listed options.
4. Next, click on the “Protect Document.”
5. Then click on “Encrypt with Password” in the options as well.
6. Enter an easy-to-remember password.
7. Click the “OK” button, Re-enter the same password, and click the “OK” button again to finish.
Now you have successfully added a password to your Word document; you must enter the correct password before you can view or edit the document.
Make sure you write down the password somewhere. Otherwise, you will be in a deep sheet if you misplace it.
Again, it is advisable to always set the same password for all your Word documents. If you keep setting different passwords after having so many documents, you may have a loss of count.
How to remove password from MS Word document
This is in case you added password protection to your Word document, and later want to remove it.
It may also be that a password-protected word file was sent to you with the password, and you want to remove the password totally so you won’t have to enter the password anytime you want to open the document.
Adding a password is not permanent, as it allows you to undo the whole password stuff.
The steps below will guide you on how to remove password protection from a Word document totally.
1. Open the password-protected Word document.
2. Enter the password of the document and click on OK to access the Word document.
3. Click on the File tab, you will find it in the top left corner.
4. Click on Info and click on the Protect Document option.
5. The following window as shown in the image below will appear on the screen. Then click on Encrypt with Password.
6. An Encrypt Document window will open on the screen. You will have to erase the old password and click on the OK button at the bottom.
7. Click on the Close tab. After that a dialog box will open on the screen, click on the save button to save the file. This will make changes in the password protection.
After doing this, when you open the password-protected document, the file will open without requesting a password. And this is how it will remain until you choose to add a password to it again.
Note: I discovered this feature from Office 2013 and the later versions and am not so certain if the previous versions have the same functionality. Please check and comment if you have the earlier versions of Microsoft Office.
RELATED ARTICLES


